In order to create a new shared folder in Windows 10, follow these steps:
- Locate the folder you want to share. This can be done through File Explorer.
- Right-click on the folder and select Properties.
- Click on the Sharing tab.
- Click on Advanced Sharing.
- Check the box for Share this folder.
- Preferably, you can change the share name if desired.
- Click Permissions. Here you can set the permissions for the folder, such as who can access it and what they can do (read, change, or full control).
- Once you’ve set the permissions, click Apply and then OK.
- Click Close on the Advanced Sharing window.
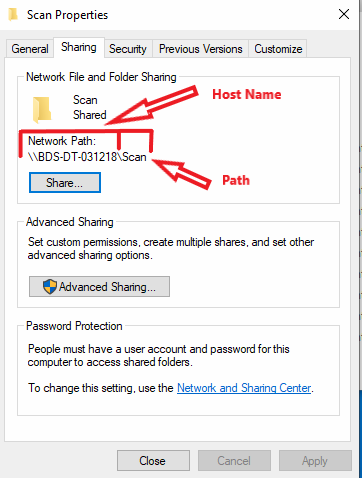
The folder is now shared on the network. You can access it by going to Network in File Explorer.
Please note that if you can’t see other computers in the Network, you might need to turn on network discovery. This can be done through Control Panel > Network and Internet > Network and Sharing Center > Change advanced sharing settings. Under your current network profile, turn on Network discovery and File and printer sharing.
About Author
Discover more from SURFCLOUD TECHNOLOGY
Subscribe to get the latest posts sent to your email.