In Microsoft Word, you can use borders and shading to make your document look more professional and organized.
Here’s how to use borders and shading in Microsoft Word:
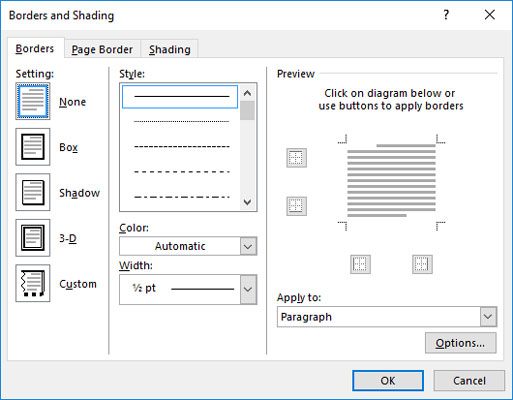
1. Boarders:
Boarders are lines that go around the outside of a table or a text box. They can be used to separate different sections of your document or to draw attention to a particular piece of text.
To add a border to a table or text box, follow these steps:
– Select the table or text box that you want to add a border to.
– Go to the “Layout” tab in the ribbon.
– Select and click on “Borders” given in the “Page Setup” group.
– Choose the type of border that you want to add (e.g., single, double, or dashed).
– Choose the color of the border.
2. Shading:
Shading is the process of filling the background of a table or text box with a color. It can be used to make your document look more professional and organized by adding visual interest to your document.
To add shading to a table or text box, follow these steps:
– Select the table or text box that you want to add shading to.
– From the main menu, select and click on the “Home” tab in the ribbon.
– Click on “Shading” in the “Font” group.
– Choose the type of shading that you want to add (e.g., solid, diagonal, or cross).
– Choose the color of the shading.
By using borders and shading in Microsoft Word, you can make your document look more professional and organized, and you can add visual interest to your document.
About Author
Discover more from SURFCLOUD TECHNOLOGY
Subscribe to get the latest posts sent to your email.