First, ensure that the image file is saved on your computer or available through a cloud service like Google Drive or Dropbox.
Next, open your PowerPoint presentation and locate the slide where you want to insert the image.
If you are using PowerPoint on a computer, there are several methods to add an image:
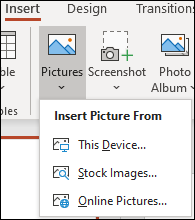
a. You can use the Insert tab. Click on the tab and select the Pictures button. Browse your computer to find the image file. Click Open to insert the image.
b. Another method is to use the quick-access toolbar. Click on the ‘Pictures’ button on the quick access toolbar, then browse your computer to find the image file. Click Open to insert the image.
c. If you are using a Mac, you can insert an image by pressing ‘Cmd + Shift + i‘ or by going to the ‘Insert’ menu and selecting ‘Pictures’.
If you are using PowerPoint Online, click on the ‘Insert’ tab. Click on the ‘My Photos’ button to insert a photo from your account. Alternatively, you can click on the ‘OneDrive’ button to insert a photo from your OneDrive.
After inserting the image, you can adjust its size, position, and formatting using the options available in the Picture Format toolbar or by right-clicking on the image and selecting ‘Format Picture’.
Remember, if you want to use an image that is not already saved on your computer or in a cloud service, you can save it first and then follow the steps above to insert it into your PowerPoint presentation.
About Author
Discover more from SURFCLOUD TECHNOLOGY
Subscribe to get the latest posts sent to your email.