Follow the below steps to share and apply permission to a folder.
For Windows:
- Log in to your computer as an administrator.
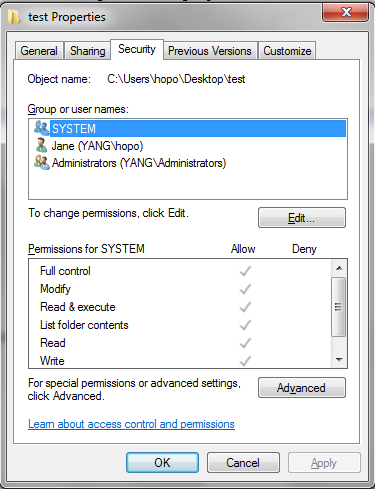
- Ensure to right-click on the file or folder you want to change permissions and select Properties.
- Select the Security tab.
- Point the mouse and select the user you want to modify permissions, and then click Edit.
- To add a new user or group, click on Edit and then Add, then click Advanced and Find now, and select the user you want to add to the permission list and click OK.
- Select the permission you want to give this folder.
- If you can’t change the permission and the area is grayed out, go back to the security tab, click Advanced, and uncheck Replace all child object permission entries with inheritable permission entries from this object. Hit Apply and repeat step 8.
For a shared folder in Newforma:
- Select Document Management > Shared Folders to open the Shared Folders module.
- Ensure to select the shared folder that you want to edit.
- To change the folder name, right-click on the folder and select Rename from the popup menu. Enter the new folder name in the field and press Enter.
- To change the folder access permissions, select the first-tier folder that you want to configure permission settings for, then right-click and select Edit Permission Settings from the popup menu.
- On the Shared Folders Permission Settings page, modify the permission settings for each user role and for individual users as needed.
- Move the mouse down or scroll to the bottom of the page and click Save to save your changes.
Note:
To make changes to a shared folder, you have to be a Project Administrator on the same team that made it. The shared folders created by the design team and the construction team are the only ones that project administrators for those teams may edit.
About Author
Discover more from SURFCLOUD TECHNOLOGY
Subscribe to get the latest posts sent to your email.